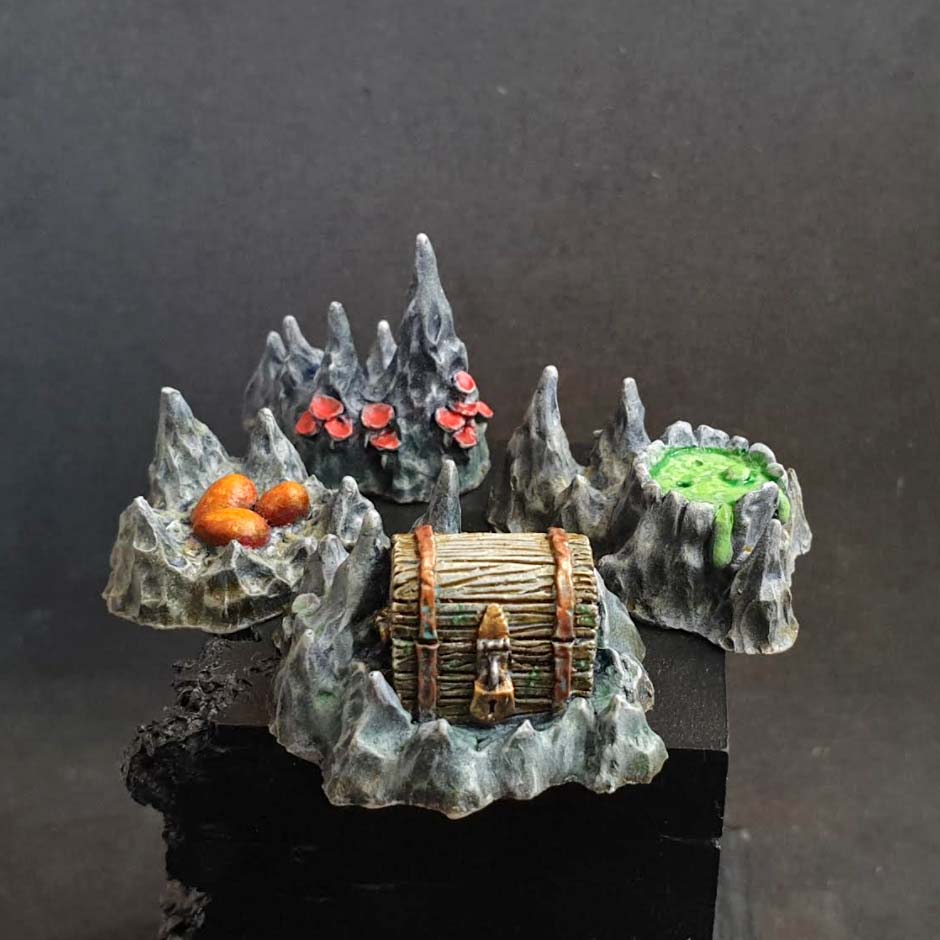
Scatter terrain are decorative pieces that help ‘set the scene’ for your games. Despite the immersive purposes they serve, or their use as objective markers, they can get overlooked. Scatter terrain doesn’t get much painting love… if at all! So with this post, we wanted to show how painting scatter terrain can be quick and rewarding. Our thanks to our friends at Grabblecast, who sent us these wonderful pieces to paint. They have a whole range of models you should check out!
Table of Contents
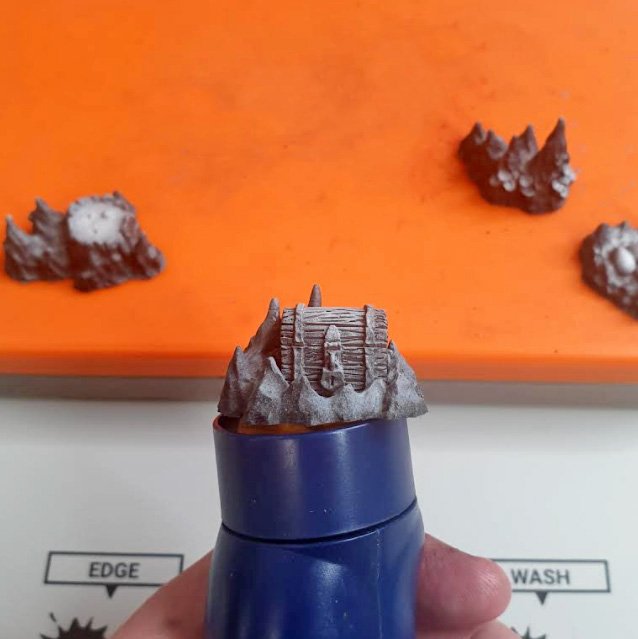
Painting Miniatures Scatter Terrain Tips: use zenithal priming!
Simple but effective, zenithal priming is a great start to any painting project!
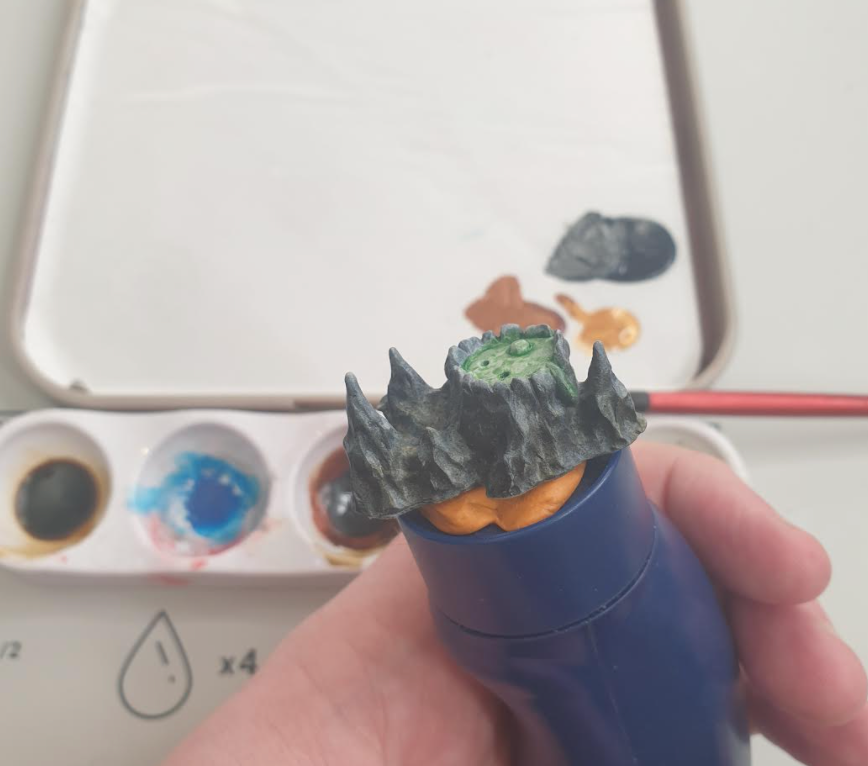
I do love ‘zenithal priming’. You may have seen me using it in previous posts and waxing lyrical about it. It sounds complicated, but it is very simple. It is quicker and easier if you spray prime your miniatures, but also works via airbrush or paintbrush. Prime your miniature with a dark color like black to simulate shadow areas, and prime white from above for the light areas. Done! In mere moments you have volumes, depth, highlight areas, and visual interest. If you have no more time for your scatter terrain, leaving it at this stage will still show key details and look better than plain plastic. The priming has really shown the high level of detail in these Grabblecast sculpts. If you have other priming paints, you can use colors other than black/white too- try brown or purple instead of black, for instance.
Prime your miniature with a dark color like black to simulate shadow areas, and prime white from above for the light areas. Done! In mere moments you have volumes, depth, highlight areas, and visual interest.
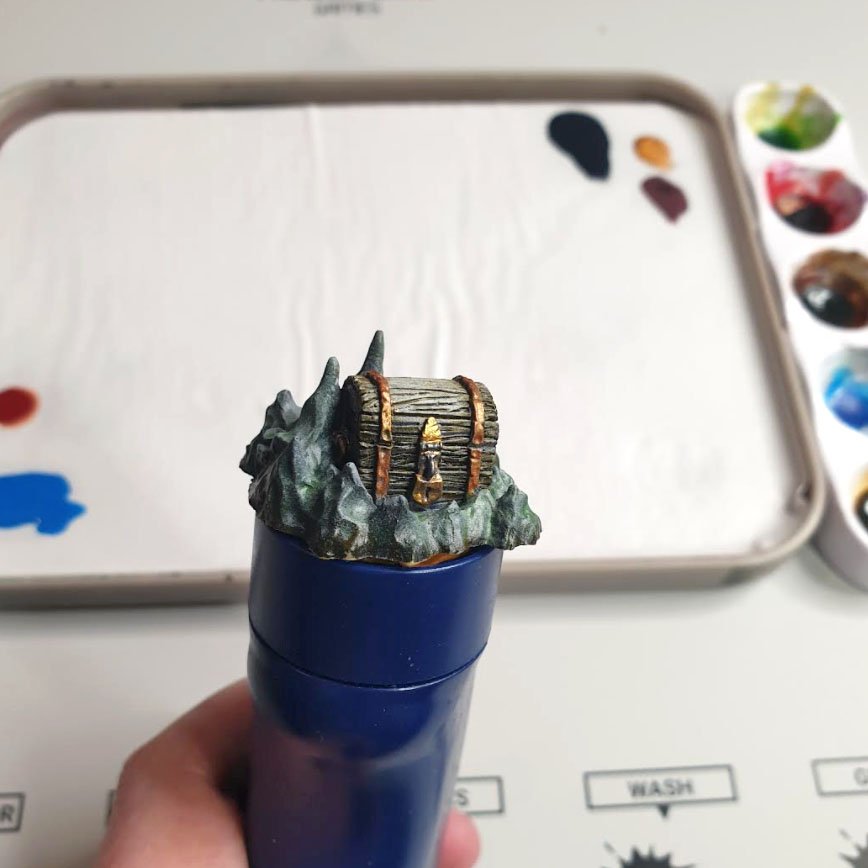
Painting Miniatures Scatter Terrain Tips: Use varnish and quick shades!
Maybe the real treasure is the painting we do along the way?
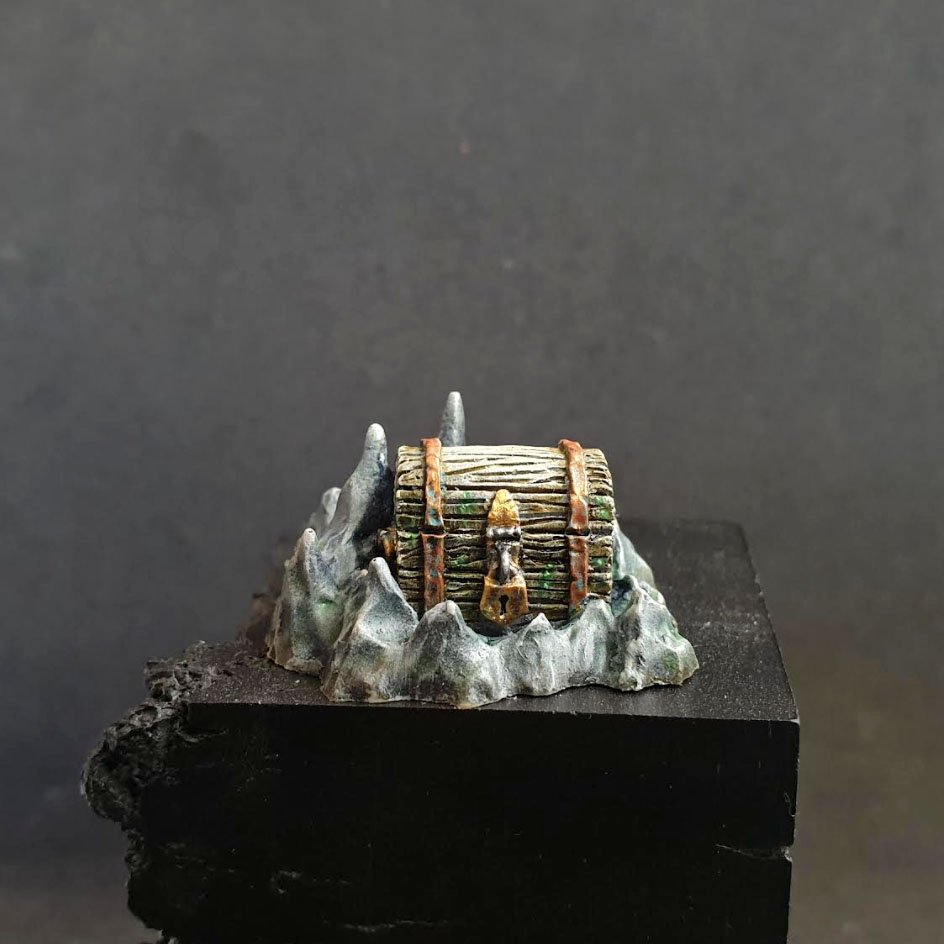
I gave the scatter terrain a quick coat of gloss varnish before the next step. This is always a good idea, especially if you are playing with it. An added bonus for us painters is that the next quick tip works especially well over a varnish. I used a few quick shades and inks to add color to areas of the scatter terrain. For the rocks, I used greens and browns, and the varnish layer helped these settle in the recesses. I used a ‘smoke’ ink for the wood of the chest, with some metal details picked out in copper/gold/silver. Done! It is hard to choose just one, but I think this chest piece Grabblecast make is my favourite, it is so characterful and I can see it being useful in DnD or tabletop wargaming as an objective marker. Thanks to my trusty wavy and size 2 brush, applying these quick shades and inks took no time or difficulty.
Painting Miniatures Scatter Terrain Tips: Use color coding!
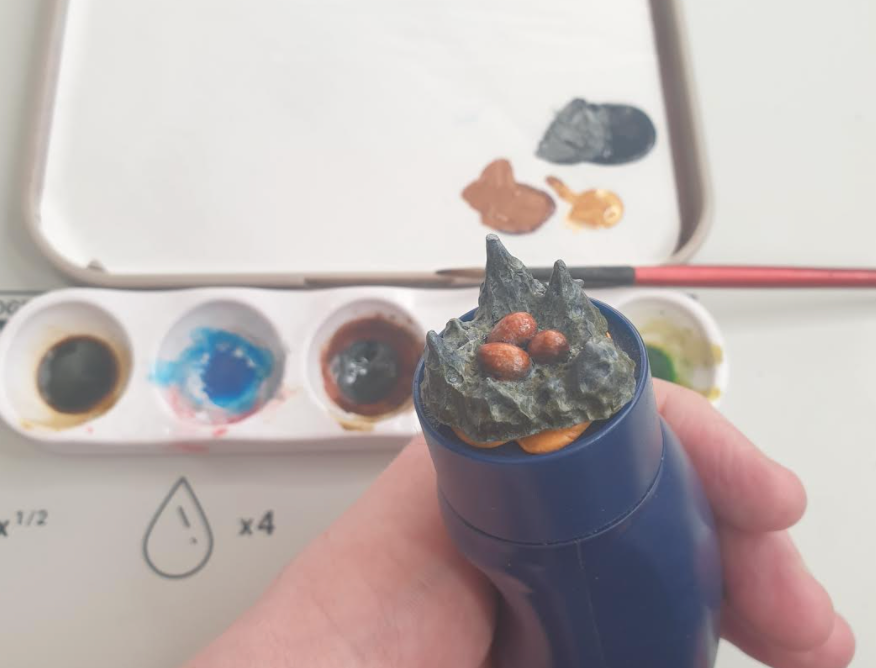
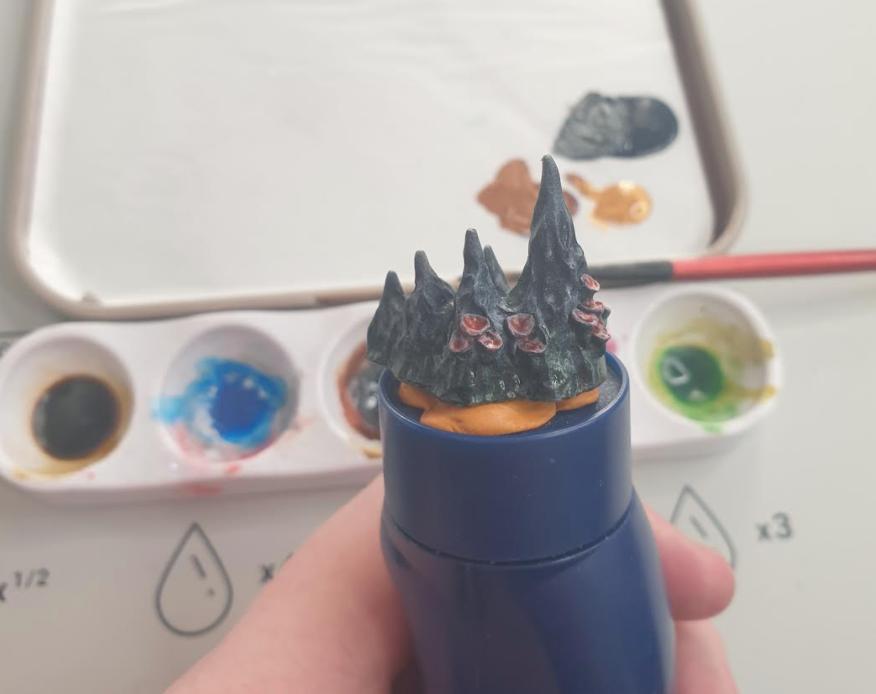
Whilst for the purposes of this post, I was concentrating on the chest, I did not neglect the other pieces! But how to make them look interesting on the battleboard or dungeon encounter, quickly? Work smarter, not harder! I did the same process for the rock formations, but color coded the distinct details of each piece. The slime pool was shaded with a sickly green, the eggs with a fiery orange, and the mushrooms with red. Over the zenithal, the thinness of the shades helps keep all those pre-highlights and shadows. In no time at all I had suggested how each piece could look and be used differently. If you have no more time to spare, you could leave the scatter terrain like this. However, some highlights would help it ‘pop’ better! And that can be speedy, too.
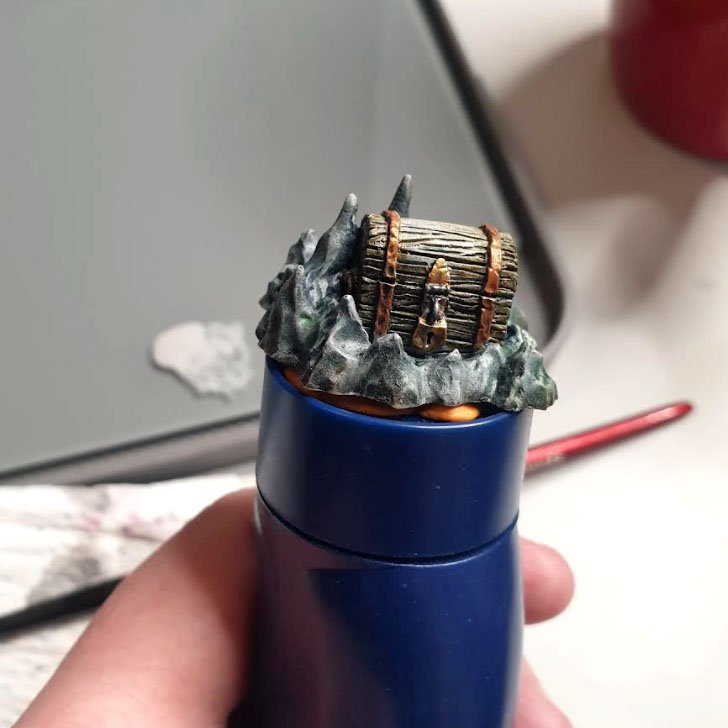
Painting miniatures scatter terrain tips: use smart highlights!
If you highlight everything, nothing will look highlighted.
Drybrushing. Poor, maligned drybrushing. But for something like this, drybrushing is perfect! It is quick and effective, and creates a textured highlight that is ideal for this stonework. Loading the drybrush with a light grey, and then removing much of the wet paint into some tissue, I can create a light dusting on only the raised edges of rock very quickly. The dark and dank parts in the crevices of the sculpts can remain dark and dank! However, I was thinking that perhaps now there was a need to add more vibrancy to the chest, and for that I would use my size 00 brush and more traditional highlighting techniques.
But for something like this, drybrushing is perfect! It is quick and effective, and creates a textured highlight that is ideal for this stonework.
I wanted to bring a bit more color back after all the grey of the stonework. So I added some pale yellow highlights on the edges of the wood to add definition and a distressed, aged look to the planks. I also added patches of greens for a mossy feel. This is old, wet wood after all! For the metal parts I was sure to push the highlights more, plus I also added a thinned verdigris paint to the copper bracings for an aged patina effect. With the other scatter terrain pieces, too, I was sure to push the vibrancy of the colors by glazing on some more highlights- orange for the eggs, red for the mushrooms, green for the slime. I think it really worked! – James