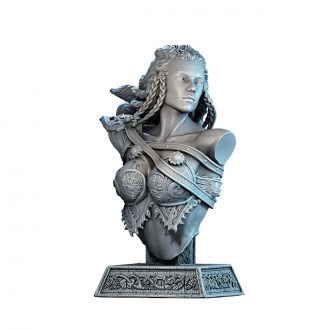
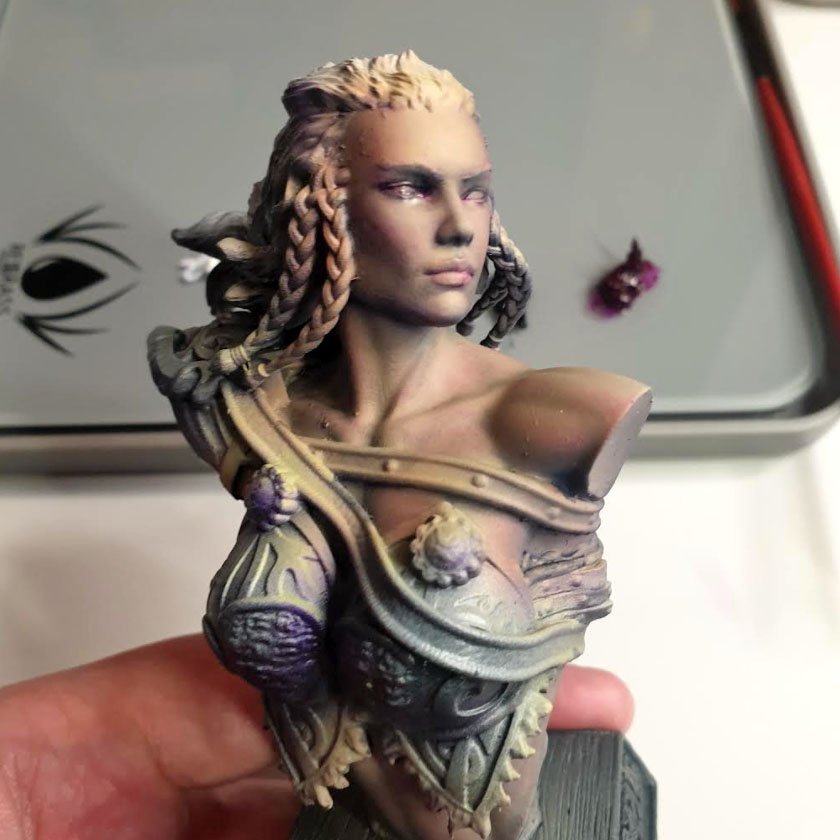
As I said previously, painting large scale resin models doesn’t have to be scary or time consuming. For miniature painters more used to 28/32mm scale figures, I suggested some ideas to help. Thanks again to our talented friends at Archvillain Games, we have a new model challenge! Archvillain kindly sent over a bust, so that I could share some tips on painting faces. For those interested in this model, they are exclusively sold here. AVG has an amazing range of 3D printable files you could enjoy, and I always recommend them! They also just released print-on-demand files through Only-Games for people without 3D printers!
Flesh tones, especially at the larger scale, can be intimidating. But with my guide to female faces made easy, that doesn’t have to be true in the future! So cast off the helmets, because even 32mm scale wargaming faces can benefit from adding more yellows and blues… yes, really! Whilst this guide contains universal tips, it is using an exemplar caucasian female face. So in future that means we can explore other facial types, too.
So cast off the helmets, because even 32mm scale wargaming faces can benefit from adding more yellows and blues... yes, really!
Painting Miniatures Female Faces Made Easy: Priming Stage
Zenithal Priming is quick and impressive, showing us where our volumes are.
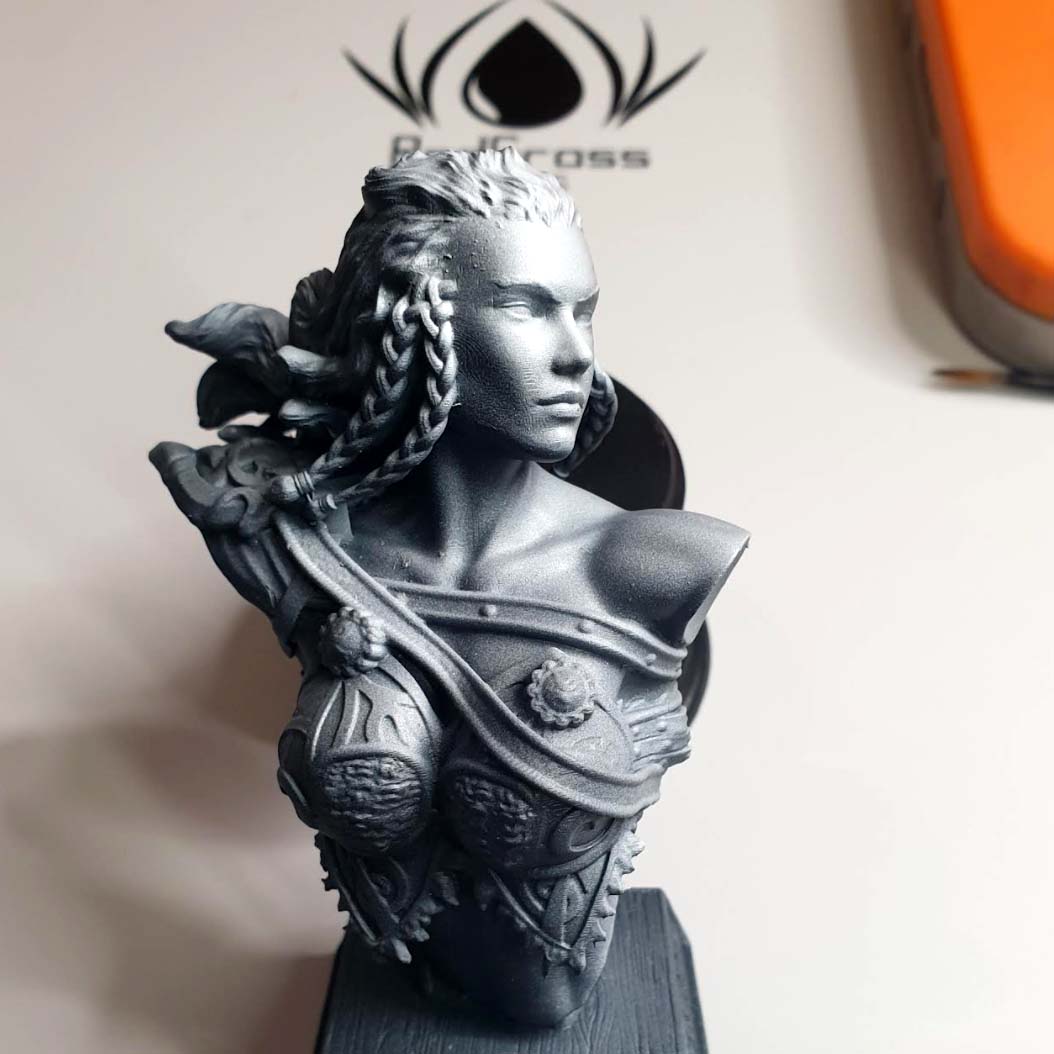
I am a big fan of ‘Zenthial Priming’ my miniatures, especially when they are not so miniature in size! It is great for showing volumes and light-fall on the miniature. I feel it also gives me a morale-boosting sense of accomplishment early on. Sometimes it is the best the model ever looks when I am painting it! It sounds fancy, but it is actually a quick and easy technique. Here I sprayed white primer from the top-down onto some grey primer. That’s it! Mere minutes and minimal fuss. A lot of pro painters use this technique, especially on large models like this one, so hopefully it can help you too.
Painting Miniatures Female Faces Made Easy: Getting Colourful With Inks
Inks are vibrant and thin, but fragile! Protect the ink layer with a coat of clear varnish.
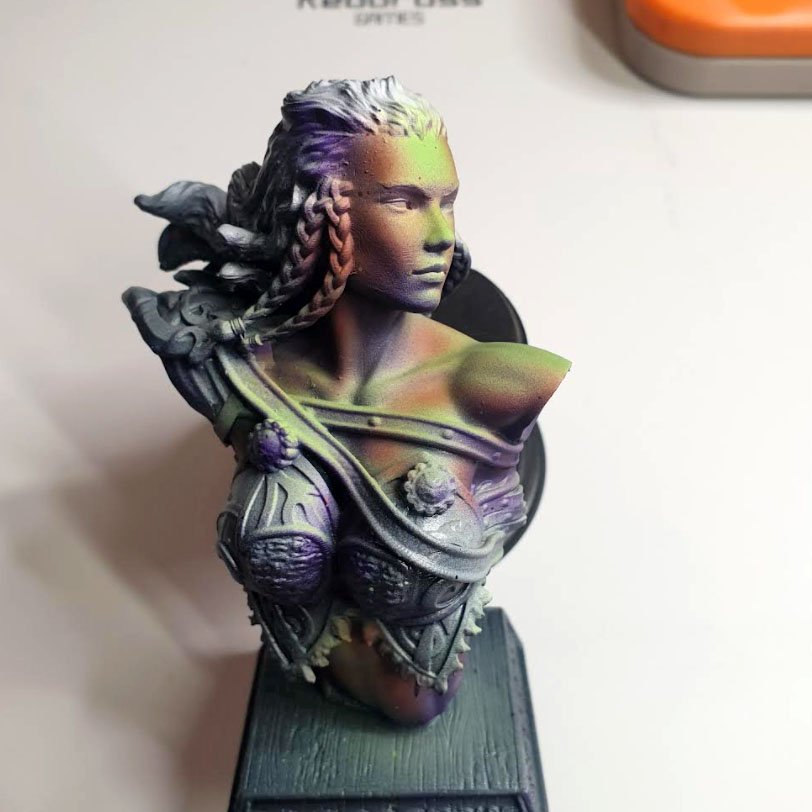
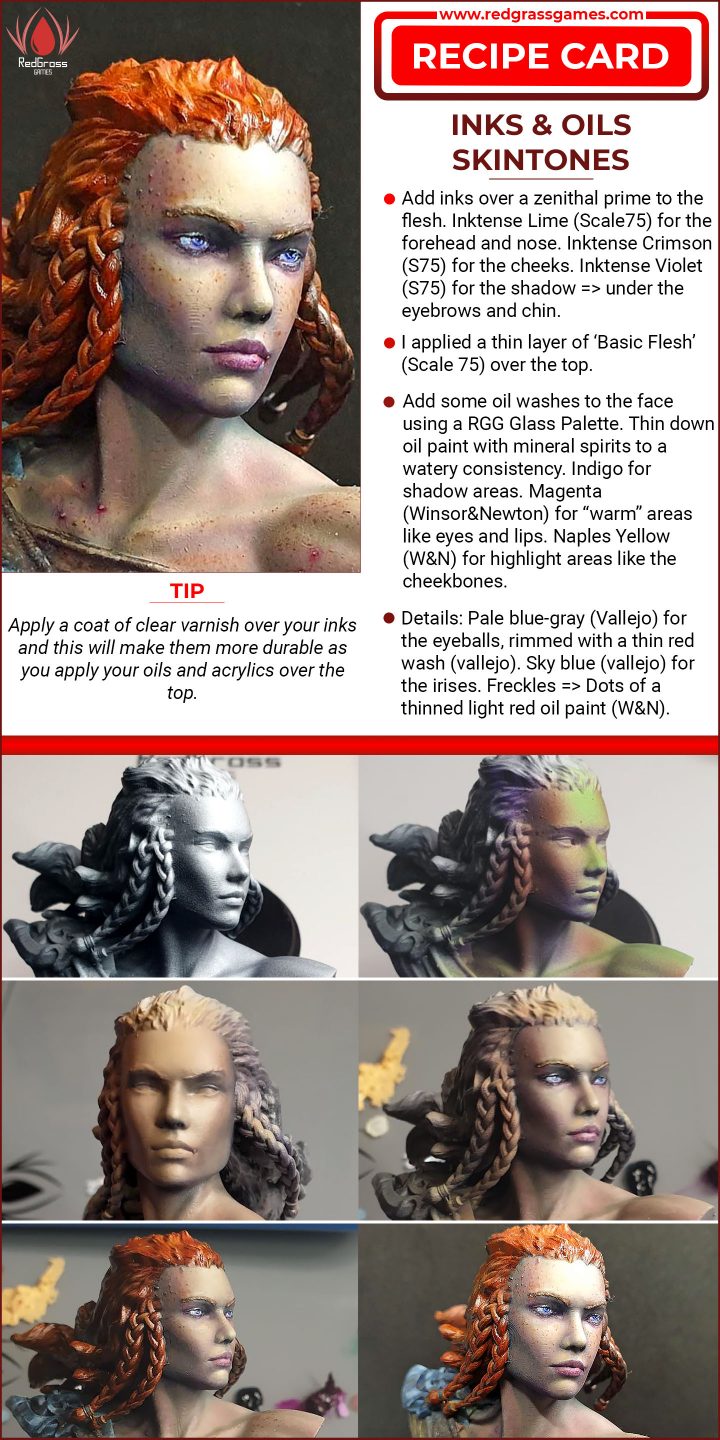
I like to underpaint large models with lots of skin. I feel it gives a more natural look to the flesh. When you look at skin up close, it’s not one uniform color but many subtle variations and tones. To help make my female face painting easier, I underpainted the skin with violet, lime green, and red inks. It looks wild! Purple is a shadow colour to use instead of black, and green is a great choice for pre-highlights. I like inks because they are easy to use and have strong colouration for their thinness. So that means fine details are left intact, which is great. After airbrushing on the inks, I applied a layer of varnish to protect the underlayers. And I left the inks to set overnight, as they can be very ‘flaky’ if you paint straight over the top of them without curing them first.
Painting Faces... With Triangles?
We used this render from our friends at AVG in order to illustrate the triangle of highlights.
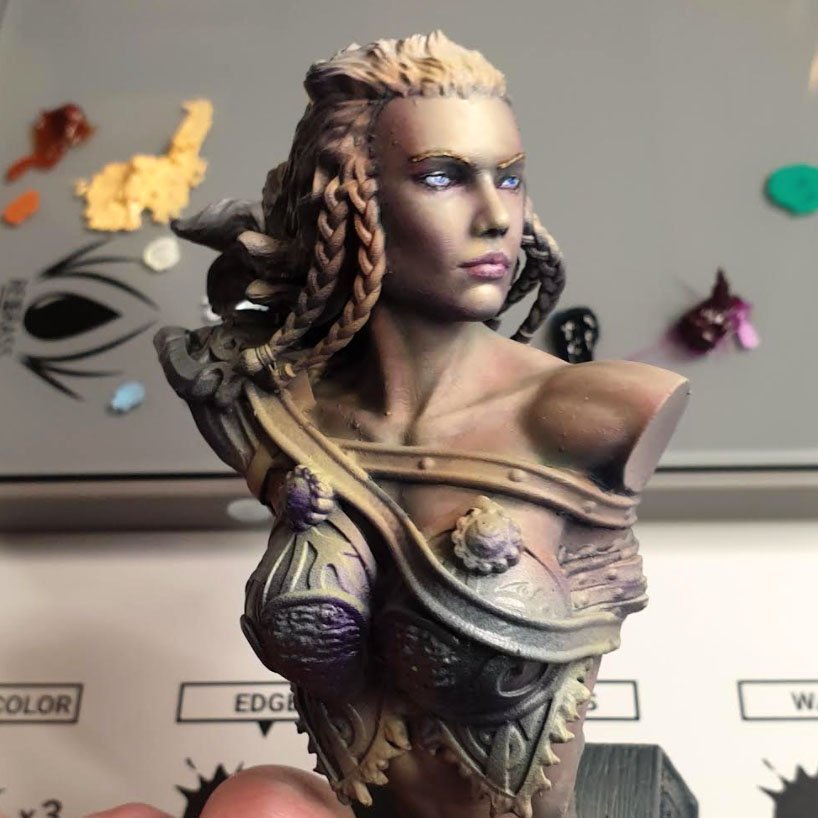
Once I applied the basic skin colour over the top of my inks, the values of the face were pretty much set! Thanks to the strong underpainting, I could see realistic highlights, mid-tones, and shadow areas. I like to imagine an inverse triangle when painting a highlighted face like this.
The forehead forms the base of the triangle, tapering across the cheekbones and nose, to a ‘point’ of light on her chin. If you are wondering where to highlight on your face, perhaps the triangle can help you, too! Remember the brow, cheekbones, nose, and chin should all be highlighted if the source of lighting is above the face. This particular face designed by the team at AVG has a strong profile, so it is ideal to show the ‘triangle of highlights’ method!
We can see the effects of the triangle highlight method even after applying the basic skin colour
Painting Miniatures Female Faces Made Easy... With Oils!
Be brave during the messy stage (L), and trust that it will blend out well with thinners (R)
I love oils. I think they can make complex miniature painting ideas less intimidating for painters to try. They also have a rich tradition in art history, so using them feels very refined! Oils have superb blending properties, and their rich pigmentation isn’t lost when they are thinned or translucent. It was also the perfect opportunity to upgrade my plastic oil palette to the RGG glass palette, which is a dream to use! I wanted to use a thinned indigo wash or filter here, to add more subtle variation and shadow to the face. However, I wasn’t sure it would work. So, pro-tip, I experimented on the back of the model first to see if it worked!
I was happy with the result, so then I felt confident to try it on the face- which would be displayed. I blotched it on using a Size 2 brush quite quickly and roughly. Then, using a brush damp with odourless mineral spirits, I cleaned away the excess and feathered the transitions. Easy and satisfying! These subtle modulations will stop the face’s skin looking too flat and uninteresting. Another pro-tip for you, however. Don’t mix your oil brushes and acrylic brushes! Oils are far harsher to brushes.
However, I wasn't sure it would work. So, pro-tip, I experimented on the back of the model first to see if it worked!
I was happy with the result, so then I felt confident to try it on the face- which would be displayed.
Painting Miniatures Female Faces Made Easy: Feeling Flush With Magical Magenta
Think about where blood might typically be closer to the surface of the skin to give it a warm or blushed appearance.
Visual interest and contrast are important features when painting faces. Whilst I loved the shadow tones created by the indigo filter, I was worried it may look too deathly. Fine for an undead model, but not here! So to balance it out, and suggest some vitality, I added warming magenta into the mix. Using the same consistency and method as before, I added magenta to blooded areas of the face, like the cheeks, temples, and lips. It was then I discovered some printing marks left over I had missed and not cleaned away. How frustrating! But I made ‘lemonade from lemons’. I used the magenta like a pin wash, and so afterwards they looked like battle scars! Very appropriate for a valkyrie, I feel!
Painting Miniatures Female Faces Made Easy: Pushing Highlights
Pale yellows help lighten without desaturating- great for highlighting flesh!
Finally, I used a similar process but this time using a pale yellow for the highlight areas. This helps suggest how the model is affected by its environment, and is good contrast. Remembering the inverse ‘triangle of highlights’ from before, I was sure just to apply the pale yellow highlights to the brow, cheekbones, nose, and chin. I think this stage really helped everything ‘pop’! You can do all of these stages with acrylics and glazing if you prefer, but I like how the oils have dappled and created nice textures up close that seem lifelike to me. Keep pushing the extremes as much as you are comfortable with, for instance by adding in a little white to spot highlights or purple to shadows. You can see I have also started the eyes and eyebrows here to help frame the face.
Painting Miniatures Female Faces Made Easy: The Fine Details
Larger scale eyes are a great way to hone your skills ready for 32mm wargaming figures.
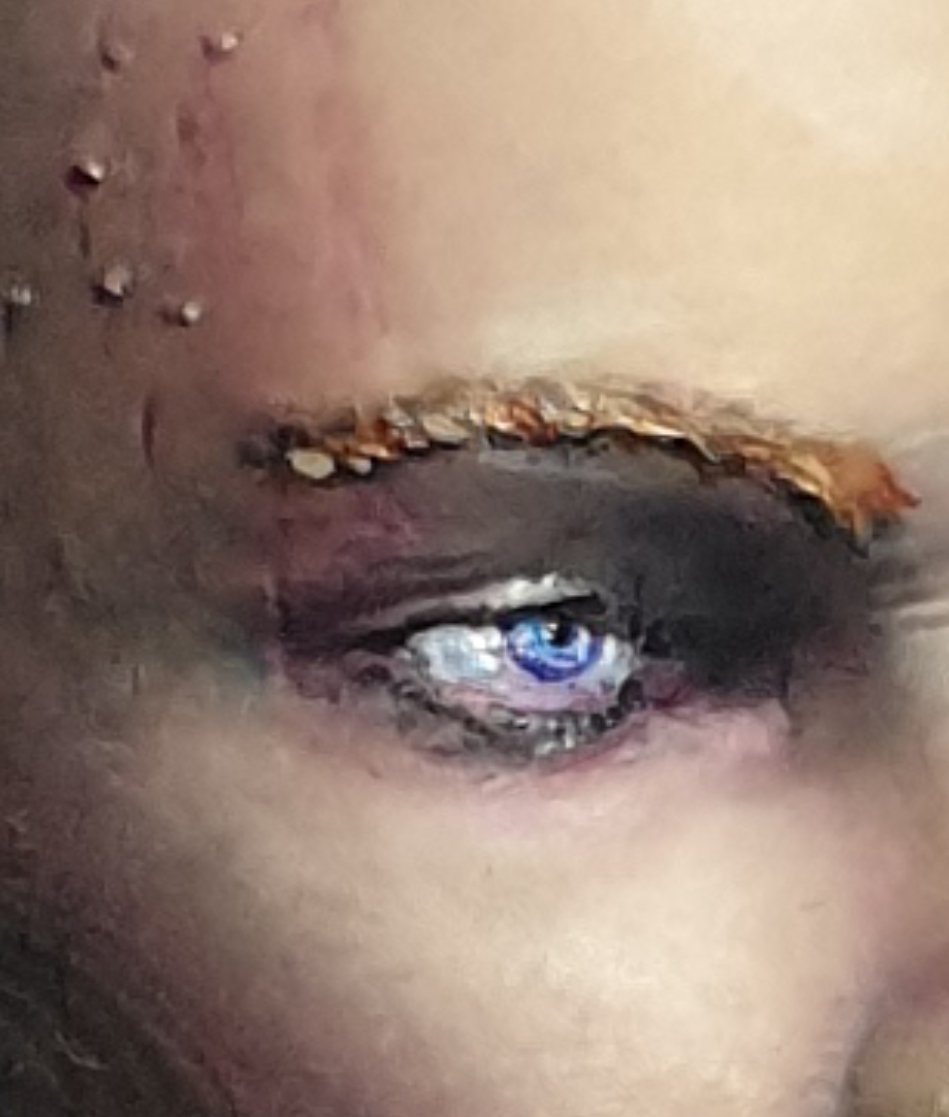
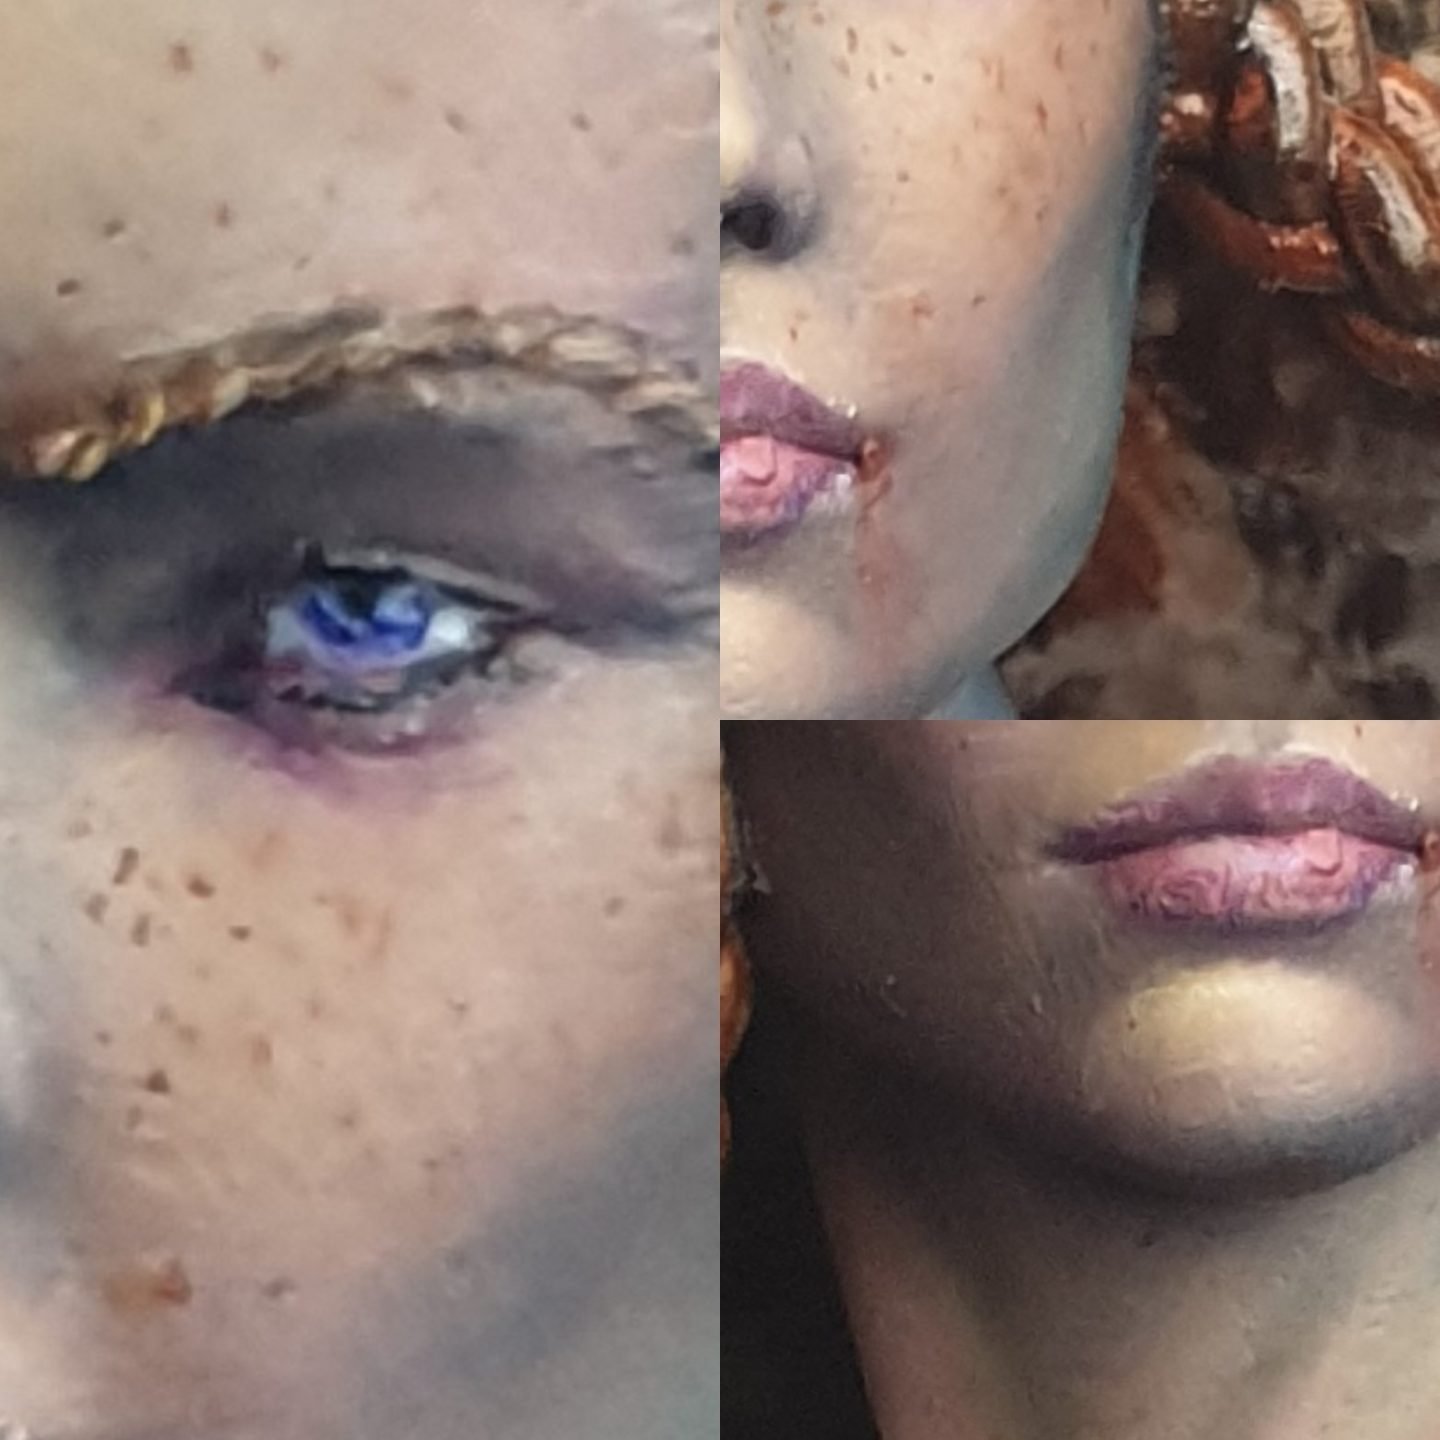
The hard part is done! And I hope that you will agree that using my tips means that it isn’t actually that hard anymore. With all the flesh complete to an acceptable standard, it is time to work out the features. I used a pale blue-grey for the eyeballs, and rimmed the eye sockets and lower quarter of the eyeball with a thinned red wash. I dotted black along the eyelids to simulate eyelashes, and textured the eyebrows with streaks of brown and yellow mixes. The lower parts of each lip I shaded with blue, whereas the tops were highlighted with pinks.
The eye details are the tricky part, but I would suggest this scale is a good place to practise them, rather than wargaming sized models! I painted two semicircles in dark blue in the upper three quarters of the eyeball, and then filled those in with sky blue. Then I did two smaller black semicircles in the middle of the sky blue. Finally I did some off-centre ‘spot highlights’ of pure white on top, to suggest the eye was round and reflective.
Finishing Female Faces
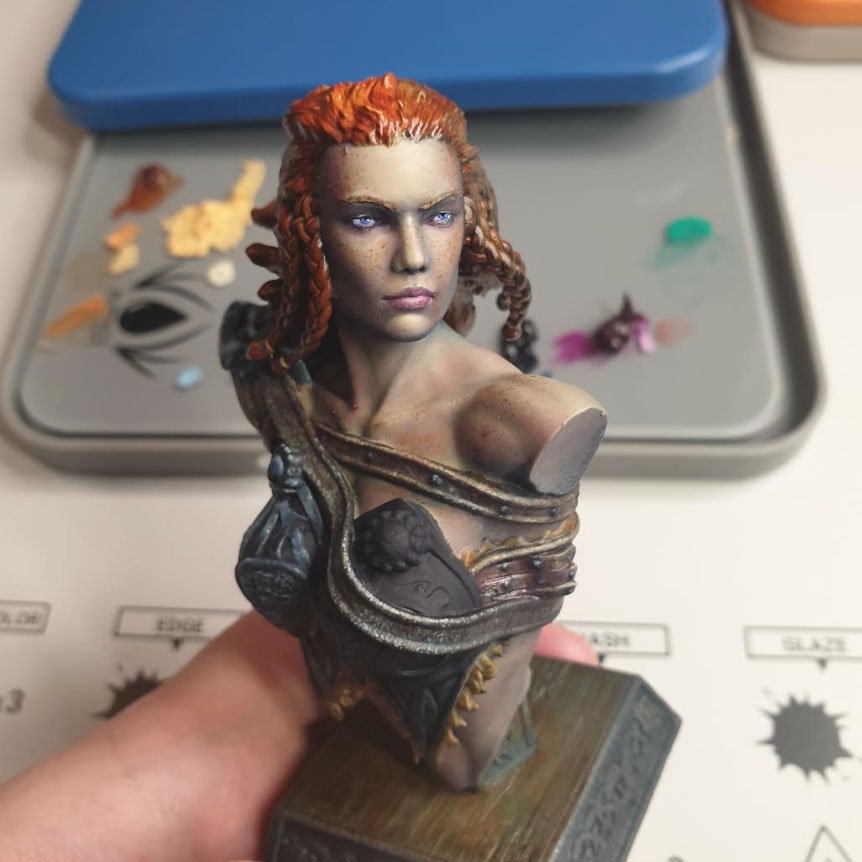
Faces are so important to get right, so focus on them wherever possible!
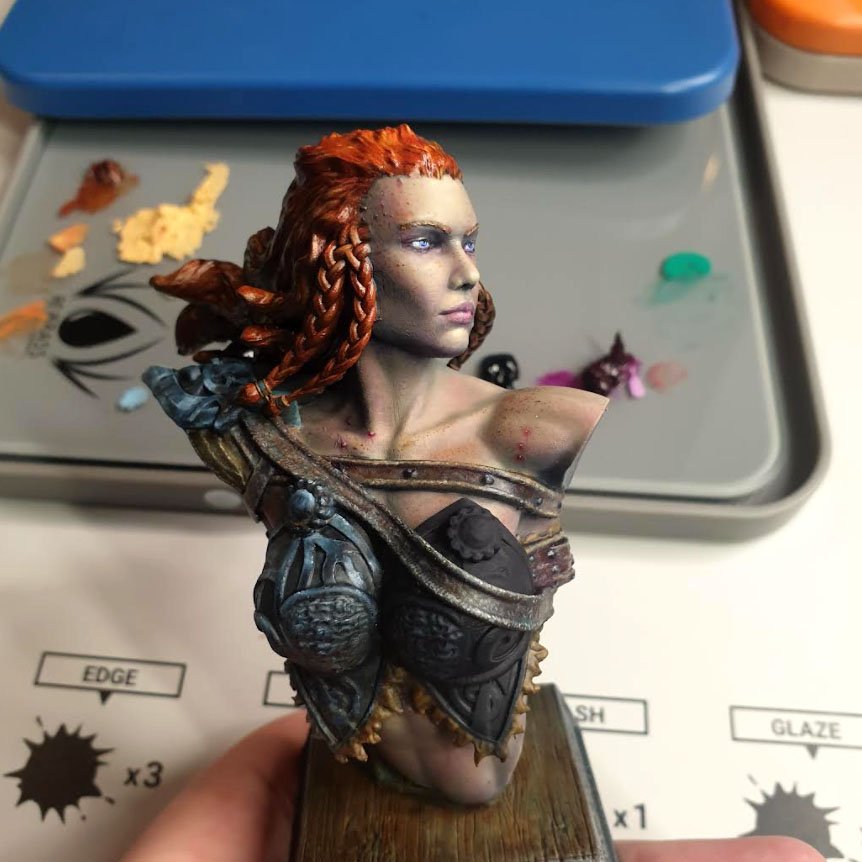
The main goal of this experience was to explore the most important ways to make painting faces easier, rather than complete the entire bust and all its complexities. So this article does not go into details of other areas. As I have said before, find key features you wish to hone and makes those the focus. Here that was the skin tones of the face. However, the ‘completionist’ in me did want to finish all of the model, so I did! However I wanted to add a bit more visual interest to the skin of her face, so I was thinking on her background as a nordic warrior.
I added freckles to her cheeks and temples, as befitting her skin tone, and a little ‘fresh’ red to some of her scars and cuts to suggest recent fights. Then I added a line of thinned indigo oil to the liminal space between her hairline and forehead too, to help add a bit more framing definition, and because sometimes I feel that is an area that looks less realistic on models if the distinction is too stark. But like a good card player who should know when to fold, I decided to call painting this female face ‘done’! James
The Finished Piece!
Painting female faces uses these Redgrass Painting tools